Monthly Archives: February 2013

A new knife!!

Img_0821Img_0827Img_0823Img_0814Img_0822Img_0821Img_0815Img_0811

So, once more I have been working in the garage on another knife, and this time I was making a larger one than last time; a hunting/bowie knife. My original design was too big to be made from a file, and anyway a hunting knife would be used to take and give powerful blows, and so if it was made from a file it would snap.

Files, you see, are made to be extremely hard so the ridges do not wear down. They are not meant to be used for chopping or whacking things, and so there is not much risk of snapping. This means, of course, the harder the better. On my other knife, it was small and thick enough not to matter really, and I am only using it for small general purpose stuff; not hacking through underbrush or other heavy chopping, like a hunting knife. 

And so, I used a piece of metal given to me by another knifemaker. This metal he had gotten specifically for knives, and was, in fact, taken from the main shaft of a chainsaw. This metal is of superb quality. I forgot to ask him what percentage of carbon, and there may be some manganese, because it is terrific steel for knives. 

I first came up with a design and drew it onto some sticker paper, which I then stuck onto the blank metal. Using an angle grinder, I cut out the profile. Still using the angle grinder, I ground down the edge. This part would have been made a thousand times easier if I had a belt grinder (Hint, hint, Mom and Dad XP).

I did a hollow grind for the edge, but near where the hilt is, I ground it a little too hollow, and the edge there became too fragile for a hunting knife, so I ground the edge a little further back, making a nice inward curve, somewhat in the style of a falcata. 

I then went over the whole thing with a little sander bit on a dremel, so as to smooth the rough corners. 

Using my new acetylene torch, I hardened the edge. The torch is so precise that I was able to harden just the edge, and I did not do any tempering until later. This is when I began working on the handguard.

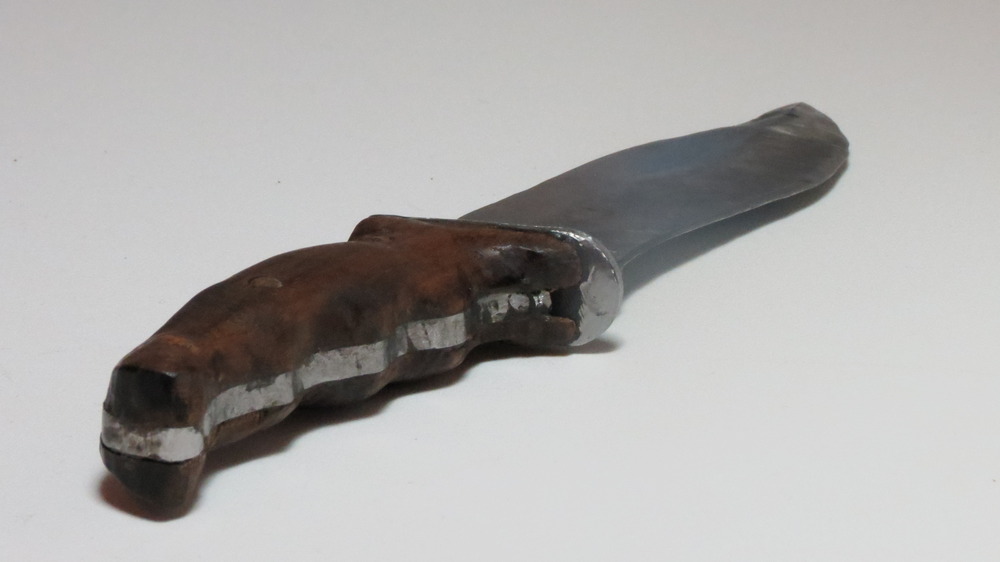
For the handguard I took a piece of metal from a file, and cut a notch in it two-thirds of the way through, and where the guard would be on the tang, I cut a notch one-third of the way through. That way I could fit them together like Link’in logs (if that’s what they’re called). It may be a bit confusing here, so just look closely at the pictures. 

I then soldered the handguard to the tang using a standard lead-tin solder and the actelylene torch. This at the  same time tempered the blade, as the heat spread up from the guard. Using another sander bit on my dremel, I sanded down the blade and handguard, almost to a polish.

Then I began working on the handle itself. This time I used some dark walnut which I had gotten from freinds. I cut out the general outline to fit the tang of the knife, and then cut the blank peice of wood lengthwise in half. Drilling holes through the tang of the knife, I matched up the two peices of wood and drilled holes through them as well. 

To get the dowels the correct size, I clamped them into a drill, and “fired it up” whilst pressing it against a rough file. Doing this enabled me to sand down the dowels to the exact size, and so I then, using a mallet, pounded them into the holes, snugly fitting the rough peices of wood against the metal. 

Using a dremel, I sanded down the wood flush with the edges of the tang, and did a rough outline with the shaping of the finger ridges, getting more and more detailed, until the wood was almost done. I took off the wood, and clamped the balde into a clamp, the tang facing me. Using some detailed metal files, I filed some decorations on the back of the handle. 

Using some super-epoxy stuff, I think it was gorrila glue, I very carefully glued the handles into place, and then pounded in the dowels, which fit in snugly. I sanded down the handle oiled it, which brings out the rich color of the wood, and brought it to a near polish, the blade itself I just sanded, as I don’t have good enough equipment for polishing the blade.

Finally, using a sharpening stone, I sharpened it to the point where it could slice through a piece of paper, held betwixt two fingers. Voila! A hunting knife! 

Electrum; An Electrical Alloy


An example of the greatly debased later histam...

An example of the greatly debased later histamena: an electrum coin of the first years of Alexios I Komnenos (r. 1081–1118). (Photo credit: Wikipedia)

(Photo credit: Wikipedia)


This is an alloy you may not have heard of before; Electrum. This metal was widely used in Hellenistic times and continued all the way into the Byzantine Empire. It was used mainly for coins, jewelry, and small statues. It was very precious, more so than silver even. It is an alloy of two metals; can you guess what two metals, once combined, create Electrum? (Comment  your answer below before reading what they are)

3

2

1

Time’s up! Did you guess? The answer is easy: Silver and Gold! When alloyed together, about 65% silver and the rest gold, Electrum is created, a much harder metal than either of the two “ingredients”, though Electrum is still soft in comparison to other metals such as Bronze or Iron. Being harder than silver or gold, electrum coins are harder to be “clipped”; clipping off the edges so as to keep the most of the metal, as well as cheating others when the coin is used to buy something.

Electrum can vary in color, as percentages of the alloy metals varied, from 40% silver to 60% gold, to 60% silver and 40% gold; the latter ratio the most common. When silver is the majority of the substance in electrum, it is a grey-silver color with a coppery hue, which is similar in color to some specific varieties of Amber, which was known by the Greeks as Elektron. Because of this similarity, the alloy of gold and silver was called Electrum by the Romans. Amber has electrical properties, and so later electricity was named after the Greek word for Amber.


Enhanced by Zemanta

A Carthaginian Sword; The Falcata

Level 0, Iberian, Phoenician and Punic culture...

Level 0, Iberian, Phoenician and Punic cultures, room 19. (Photo credit: Wikipedia)

Iberian falcata. Hilt ends in a feline's head....

Iberian falcata. Hilt ends in a feline’s head. Blade was decorated with stuffing silver motifs. (Photo credit: Wikipedia)

Level 0, Iberian, Phoenician and Punic culture...

Level 0, Iberian, Phoenician and Punic cultures, room 19. (Photo credit: Wikipedia)


While the Romans preferred their short stabbing sword, the gladius, the Carthaginians made use of a different sword, called the Falcata. The original design was actually stolen from the Greeks, whose sword was called the Kopis. 

The design of the Falcata is amazing, actually. The sword is single-edged and curved, but unlike almost all curved swords, the edge is one the inside of the curve, not on the outside like the Katana. Also, the blade is very thick at the end, making it heavier towards the tip. This enables an extremely powerful swing, and packs the power of an axe with the keenness of a sword, and small enough to take out of a scabbard without having to swing around an iron head on the end of a stick. 

The boulbous part near the end of the blade would have been used the most, and so good quality steel was needed there. Fairly high carbon steel could be used, as that part was so thick that there was little risk of breaking, rather, the best quality steel was needed near the handle, at the furthest indentation of the curve. Here was the most likely place to break, as it was thinnest and the force would always be coming from the same direction. 

The Falcata has a characteristic spine on the back; a ridge that is very thick and designed so that most of the kinetic energy is disposed here, and dissipates. If you notice here in the picture -> , the spine is thickest at the weakest point of the blade, near the handle. This makes up for the thinness, which otherwise would break farily easily.

The power that this sword could wield is amazing, and could, if not pierce the armor, could certainly break the bone underneath.

Enhanced by Zemanta

Damascus Steel

Close-up of a modern pattern welded damascus s...

Close-up of a modern pattern welded damascus sheath knife (Photo credit: Wikipedia)

English: Damascus Steel, Stag handled Bowie by...

English: Damascus Steel, Stag handled Bowie by TC Blades Removed from the following pages: Damascus steel –OrphanBot (talk) 08:26, 20 April 2008 (UTC) (Photo credit: Wikipedia)

Damascus steel. You’ve probably heard of it as some sort of super-metal; blades made from it can cut through a bar of Iron and a hair falling onto the edge would be sliced in half. Though that is not exactly true, Damascus steel is a very good quality steel. 

Truth be told, no one really knows exactly how damascus steel was made, though today we know of a method called billet welding which may very well be how Damascus steel was made hundreds of years ago.

Billet welding is when two types of steel, one high-carbon and one low-carbon are forged welded (a fancy term for saying “pounded together”) together until it is a two layered block of steel; one side high-carbon and the other low. This block is hammered flat and folded in half, and then hammered into a single block. This block now has four layers. It is folded in half again, and hammered into a block, which now has eight layers. This process is repeated over and over until there are around 300 layers; every time the block is folded in half, it doubles the amount of layers. Once it has enough layers, it is forged like ordinary steel into a blade or whatever object is desired.

The interchanging hard and soft steels create a superior blade; the soft steel keeps the blade from snapping and the hard keeps a good strong edge; providing a superior blade that was extremely popular from the time of the byzantine empire until the 1700’s when steel smelted through new smelters became superior to Damascus steel, and thus replaced it. Pattern-welded steel is still of supreme quality, and many bladesmiths still use it in their blades.

Enhanced by Zemanta

Knife Styles

After finishing my first knife, I was feeling ready to make some more, and hone my skills. I started out by profiling a large hunting knife, which will used mainly for such things as camping, exploring, and other such things that would require heavy chopping and cutting. At the time of writing, I am almost done angling down the edge, of which I am using a Hollow Edge, which will make the knife much sharper and it will cut much smoother than a convex  edge.                              

However, when I designed the knife, I did not have a picture in my mind of what it would be used for, I just wanted a large knife that would be sharp and would look cool. The other day though, on the way to the Gem Club where I got the Acetylene tank fixed, Dad asked me to sketch a design for a knife that would ornamental and one that a young lady would carry around with her for self defense.

I started sketching, and what I came up with was a slender dagger, thin near the hilt (little more than a centimeter), and then suddenly widening out to about an inch wide, and then thinning into the point, about three inches further along the blade. Because it would be so thin, it would enable very easy stabbing actions, and (sorry if I get graphic) would deal more damage as the blade went further in, as it widened only gradually, meaning easy in, easy out, so the bearer of the knife could do quick stabs as fast as she could.

It would be this thin because it is not meant for cutting or hacking, such as a hunting knife, but rather for quick stabs. The thin, graceful blade would match it’s bearer. It would be a small, beautiful thing that could be worn on a belt, beautifully glinting and warning potential assailants.

This knife will probably turn out better than the hunting knife will, as I had a better idea of what it would be used for when I designed it. Anyway, we’ll see how it turns out!

Acetylene Tank

Img_9383

Just last night my Dad took me to the Shasta Gem club, intending to work on a new hunting knife I’ve been making (I’ll blog about that some other time). When I had been taking my silversmithing lessons a while back, we bought from him some equipment; a dremel, the hose and torch for acetyelene, and the tank of acetylene. There was some problem with the nozzle of the tank, and the regulator (the thingy that controls how much gas is travelling into the hose) would not screw onto the tank all the way. 

Anyway, we took the tank as well as the torch, hose, and regulator to the gem club to see if anyone knew what was wrong. The members of that club are experts at these sort of things. One of them, who was expert at welding and steel types, and so knew all about torches and that sort of equipment, tried out the regulator on our tank. As usual, it didn’t screw on all the way, and he then tried it on a different tank there to see if there was a problem with the regulator. It tightened fine on the other tank, then he tried it again on my tank. This time, for some reason, it tightened fine, and he hooked everything up and “fired it up”. It worked perfectly, with a beautiful blue flame. He showed me how to light it, turn it on and off, unhook everything for travel and screw it all back on. He also gave me some tips on hardening and tempering steel, and also the types of steel in use today. 

So now, I have an Acetylene torch, which produces very precise and concentrated heat, and is nearly hot enough for welding steel!

Gladius vs Xiphos

English: Greek Xiphos Italiano: Spada oplitica...

English: Greek Xiphos Italiano: Spada oplitica tipo xiphos (Photo credit: Wikipedia)


300px Gladius

300px Gladius (Photo credit: Wikipedia)

The Romans and the Greeks used very different types of swords; the Romans used a Gladius, and the Greeks preferred the Xiphos

The Gladius was somewhat short, with a small handguard, and a straight blade, made of steel. The blade was angled down into the point very steeply, which enabled for an easy stab. Because it was so light and short, it was easy to move around quickly in a small space, stabbing where needed and easy to pull out of the sheath after throwing the pila. It was reliable and there was no chance of the sword breaking if the legionary used it as he was trained to do, though the edge was fairly soft, and could dull quickly. The gladius was the legionary’s primary weapon.

The Xiphos was a little longer, with a leaf-shaped blade designed so the bulk of the wheight was to the front of the blade, enabling a heavy, powerful slash. It was made of bronze, as that was the best metal the Greeks had access to at that time, though compared to iron, it was pretty brittle. Because of this, it was possible that the sword could break in an especially powerful blow, as the Greeks wielded their weapons with tremendous strength. Though it was brittle, that also meant that the edge was very hard and was nearly impossible to dull, meaning it could be used quite extensively. The Xiphos was the Hoplite’s secondary weapon, after his spear.

Now, which of these two weapons are superior? Which one would you choose as your weapon, given the choice?


Enhanced by Zemanta

The Six Metals Most Used By The Romans

Lead pipe in Roman bath in Bath, Somerset, Eng...

Lead pipe in Roman bath in Bath, Somerset, England. (Photo credit: Wikipedia)

The Roman Empire, like other nations, needed quite a variety of metals, such as lead, tin, copper, gold, silver, and iron.

Lead was used in plumbing, as it was soft and melted at a low temperature, so it was easy to solder. It was used in the making of pewter, and was used for a variety of things that did not need much strength, and yet could be used for molding things, or even sealing things closed, like a coffin, for instance. Also, one of the main reasons lead was mined actively is because it is most commonly found in the form called galena, a mixture of silver and lead; double gain for the mining overseers.

Tin’s main use was in the making of bronze, as bronze is made when tin is alloyed with copper. In the as you know, in the iron age bronze was not in use very much, though because it was more expensive than iron, Roman Centurions often wore bronze helmets and used bronze swords. Other than for bronze, tin was used in a variety of little things, like cups and small decorations, and also for casting into little statues.

English: Snake-type bracelet Bronze Pitalpin n...

English: Snake-type bracelet Bronze Pitalpin near Dundee (found in 1732) Dated Iron Age (Photo credit: Wikipedia)

Copper is, as you know, the other metal used in the making of bronze. That said, it was also used in jewelry and decoration, due to it’s gorgeous reddish gold. I myself know that copper is fun to work with, and it nice and malleable, so it could used then to make snake bracelets, so-called because it was basically a long strip, sometimes made into a snake, and wrapped in a spiral up and around the arm. Very fashionable.

Gold was the leading metal for jewelry and coins, because of its warm golden glow, its rarity, and the ease of which it is to work. Gold does not oxidize, so one needs not worry about the heat source burning the metal, and it is fairly soft, so it is easy to work, and yet hard enough so as not to fall immediately apart. One of the methods for mining this valuable metal was called hushing, where first a fire was made against the rock, under which there was ore, and then it was doused with water, making the rock brittle and ‘crumbly’. Then a flood of water (brought by an aqueduct) was washed over the area, digging down a few feet to the ore. This they do as many times as it takes to get down to the ore. Once they had reached the ore, again a fire was made against the ore and doused, making the rock very brittle once again. The ore is then broken up, and panned for gold.

Silver was used much the same as gold, though less in value, as well as being subject to tarnishing. Despite this, it was highly prized, and often was alloyed with gold to make electrum, which was used in coinage. One of the main sources of silver were the mines near Athens, which were very rich in silver. In the prime of the Hellenistic age, these mines made Athens very rich, and in the Roman conquest, it was the Romans who got that wealth.

Iron. As I hope you know, iron was used mainly for war. From swords and javelins to chain mail and helmets, iron was vital to the Roman conquest of the world. In fact, during the rise of Rome, regulating carbon amounts in the iron to make steel was developed, hardening and tempering that steel, and techniques on sword making were perfected. One could well say that the Romans knew nearly all of the techniques then developed, as their Empire spread from Persia (with the secrets of Damascus steel) to wild Gaul, (with the perfections of chain mail). It was Rome’s ability to adapt to the surrounding and copy their enemies designs, rather than stick with one metal and one soldier type, and never change. This was the outcome of the fall of the Greeks, who preferred to stick to the old ways of the Hellenistic age, rather than copy the strong points of those enemies who came before them.

Enhanced by Zemanta