Monthly Archives: January 2015

Inlay: A Simple How-To

I can’t say that I have very much experience on inlaying silver in wood, but I have done a few projects with a good amount of success. You’ll need the wood you want to be inlayed, silver or copper wire to inlay (make sure it’s annealed), superglue or epoxy, a light hammer, and a dremel and engraving bit, like this one , the same diameter or so as the wire.

Photo credit: Lowe’s

Start by marking out with a pencil where you want the inlay. Clamp down the wood, and use the dremel to carve a trench along the line. The trick here is to start at one end of the line, and go “under water” (wood-wise) to make an undercut trench, so it’s wider underneath than at the top of the trench. Once this is done, if you are using epoxy mix it up, and dab a small amount into about an inches length of the trench (too long and it hardens before you get there). Take the wire, line up the end of the wire with the end of the trench, and start lightly tapping it into place. Tap it into the trench, being careful not to move it out. Tap it into the trench until you reach the end of the glue line, then start again at the beginning, tapping a little harder. This flattens the wire down into the undercut, so it become held in not only by the glue but also the wood above it. Add more glue further along the trench and repeat. Once you have finished, carefully clip off the excess wire, tap in the end,  and wait for the glue to dry. Once it has done so, use files and sandpaper to grind the wire completely flush with the surface of the wood.

Fighter WIP: Part II, Handle

image image image image image image imageThe customer sent me a box with the woods and spacers, which arrived this morning, along with several plates of thick copper from another very nice bladesmith. Unfortunately I did not get many WIP photos, so bear with me.

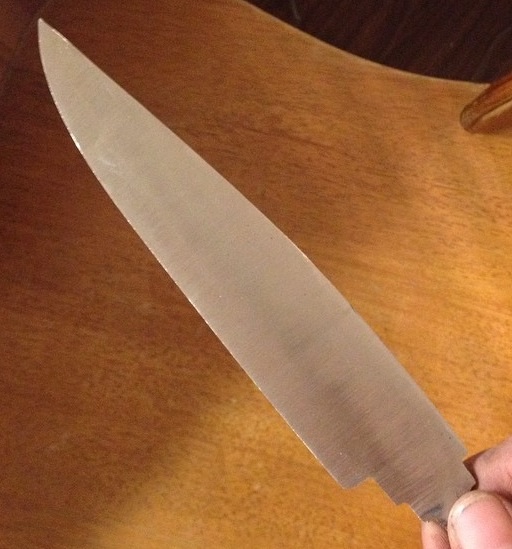
I started out with the guard, from copper plate, which fortunately already had a hole in it (I need to get new drill bits soon). I used needle files to enlarge the hole into a slot, matching it up with the shoulder of the blade. Notice I ground the blade where it meets the tang in several sections, there’s the ricasso (rectangular part where the blade stops), the shoulder, then the tang. The shoulder is a small transitioning piece, where I fit the guard onto. The ricasso then, expands over the guard, which gives the impression of a “single piece” construction. The tang is then slightly smaller, which helps later when I epoxy it all together.

After filing the guard to fit the shoulder snugly, I took it to the grinder and shaped it into a teardrop shape (I have a personal fondness for that shape, having cut many stones in it), then sanded it to 320 or so. I then began work on the handle, cutting some spalted maple to shape, drilling and fitting the tang, then doing the same for the carbon spacers and purple heart. I finally got it fitted, very very snugly, and after tapping all the pieces together, they held together perfectly by only friction. Then it was a combination of files and a 36 grit belt on the grinder to get it roughly shaped. It’s quite tricky as the maple is significantly softer than the purple heart, so after grinding the purple heart side, I have to adapt very cautiously to the maple, so as to avoid making costly mistakes. After rough shape, I switched to a 220 belt to smooth sand it all. Once this was done, I took apart the pieces, polished the blade, and soldered a short section of copper rod to the end of the tang, extending it about a centimeter past where the end of the handle would be. Then time for final assembly.

I slipped on the guard and used a hammer to secure it firmly against the tang, polishing it after to take away the forging marks on the copper. I used a liberal amount of epoxy on the maple section, and slipped it on against the guard. I had to work fast because of how fast the epoxy sets. To keep the blade still while I worked, I stuck the blade tip first into the workbench so it stuck firm with the tang in the air. One by one I put on the spacers, with epoxy in between each layer. Last was was the Purple Heart, which I gave an extra amount of epoxy as it was the end piece. Once on, I tapped the pommel to firmly press it all together. While it cured, I peened the copper tang extension, which mushroomed over and into the Purple Heart, locking it in.

Once the epoxy cured I used a 220 belt to sand off the excess epoxy, grind the pommel nut flush, and do any final shaping.

The customer asked for a symbol he sent me a picture of to be inlayed, a sort of mix of a 4 and an F. One side of the spalted maple was fairly bland compared to the other, so I chose that place to inlay. After marking out with a pencil, I used a small Dremel bit to carve out a trench in the shape of the symbol. I then cut out small strips of silver from silver sheet, slightly wider than the trench was deep, and cutting them to the right lengths. I dabbed a generous amount of superglue into the trenches, and tapped the silver strips into the trenches sideways. After the glue had cured, I took it to the grinder and sanded the inlay flush, after which it was a progression of sandpaper until I reached 400 grit, oiling it every now and then. After sharpening, the blade was finished, and I made a leather sheath to go with it.

Fighter WIP, Part I: The Blade

This is a “Bowie Fighter” commission I’m working on for a customer. I started out with leaf spring steel, which is normally, or at least very close to, 5160. After drawing up a design, I used a metal cutting disc on a miter saw to cut a leaf spring section in half, lengthwise. Then I began forging out the steel, from about three eighths of an inch to a little over one eighth of an inch. This both widened and lengthened the blade. Once I made good headway there and got close to the thickness I wanted, I started to draw out the tang a little bit, which I returned to later. I then began working on the tip, switching between putting the steel on edge on the anvil, and laying it flat to straighten and flatten every once in a while. https://i0.wp.com/photos-c.ak.instagram.com/hphotos-ak-xaf1/t51.2885-15/10932202_807916892579402_217579686_n.jpg

Once the tip was well formed, I switched to the lighter hammer and began working on the blade, lengthening it and widening it to match my design. After I was satisfied, I finished drawing out the tang.

https://i0.wp.com/photos-f.ak.instagram.com/hphotos-ak-xaf1/t51.2885-15/10932154_601957946616429_2013822908_n.jpg

I then straightened and normalized (heated to critical and let cool) thrice, and the forging was complete. On the belt grinder I used a 36 grit belt to profile the blade; get it to exact shape. https://i0.wp.com/photos-e.ak.instagram.com/hphotos-ak-xfa1/t51.2885-15/10919207_650445451731116_1083562380_n.jpg

Then began grinding the bevels, or the flat of the blade where it slopes down to the cutting edge. After getting very close to where I wanted it, I switched to a 220 belt, to smooth it all and take out the scratches from the 36. I brought the edge down to about a millimeter or two thickness (if it’s too thin it would lose heat too fast later in heat treating). https://i0.wp.com/photos-f.ak.instagram.com/hphotos-ak-xaf1/t51.2885-15/10932055_744073782351685_1715690222_n.jpg

Once this was all complete, I heat treated, by heating up to critical temperature (where a magnet will not longer stick) and quenching in warm motor oil to harden. Once it had cooled I placed it in the oven at 375 for about six hours to temper. I finished hand sanding and polishing one side of the blade and will begin the other side soon, and the blade will be completed. After that it is on to handling.

Cocobolo Dagger

This is a commission from a friend of mine, who I’m trading this to for a shirt of chain maille. This is my first successful hamon and I’m very pleased how well it turned out. The keyhole construction was a little past my skill level, so I don’t intend to do it again very soon.

  • Steel: 1084, forged and ground, clay quenched and tempered at 400 for three hours, then polished and etched in boiled vinegar.
  • Guard and Pommel: forged and ground from railroad spikes. I find that RR spikes are thick enough and soft enough to work good guards and pommels out of.
  • Wood: Stabilized Cocobolo, an exotic tropical wood used a lot by bladesmiths. I had to be careful when sanding this stuff as it tends to be toxic when inhaled.
  • Inlay: Silver solder. I intended to use sterling but had none around at the time. Solder in wire form works very well, and is a good bit harder so resistant to deforming.

Note: I designed the construction so the pommel fit into the wood first like a puzzle piece, and then the tang inserted through the handle and pommel, holding the pommel in place and keeping it from sliding out. Blade is secured with epoxy, as is the pommel along the joints.

Mini Bowie

IMG_0429IMG_0422IMG_0430-3

My most recently finished blade, a small American-style bowie. I started with a farrier’s rasp, cut into fourths, then forged about 95% of the way to final shape, normalized thrice, then ground on the belt grinder. I tend out forging a piece of steel with a bit of an idea of what sort of blade I want to end up with, then tweaking as I go along until I’m happy with it. I then go to paper, trace out the blade, and design a handle off of it.

After grinding the blade to 220, I clayed it for a hamon, and placed it in the forge to reach critical. While I waited for the forge to get it up to heat, I began cutting out some oak burl for   the handle, then shaped it on a 36 grit belt on the grinder. The wood piece was a little too short, so epoxied several pieces of leather together for a stacked section, then drilled through them slightly thinner hole than the tang.

Once up to heat, I quenched the blade in motor oil to harden, which succeeded first try, without warping. I then tempered at about 400 fahrenheit for two hours.

While the blade tempered, I went further in shaping the handle. Hardly anyone uses oak burl because of how brittle it is. I just went slow and gradual with the shaping, avoiding using rough files. I finished off with 220 grit. I also began working on the guard, a very simple one this time. Copper sheet textured with a ball peen hammer.

After the blade was done tempering, I got exact measurements of the tang and used that to drill the slots in the guard, leather, and oak. Normally I would use a drill to get close to thick enough in the wood, and then burn the tang in, but being oak I didn’t want to risk it. So instead, I drilled all the way through, which enabled me to use a round file to get it to exact shape. The hole at the butt end of the wood, I used later to house a .223 remington shell. After everything fitted perfectly together, I began sanding the blade, always the most tedious and boring part. Sanded up to 1500 grit, then I tried etching with boiled vinegar, which did not work, either because it was too watered down, or because the steel type. Regardless, I did get a very very slight hamon.

After the blade was completely finished, save sharpening, I fitted and pressed all the pieces together, with a generous amount of epoxy. After epoxy had cured, I sanded the leather and oak flush with each other and smooth on the slack area of the belt grinder, then oiled, hand sanded, and oiled again. Then sharpening and finished!

Things to improve on next knife: Use thinner coat of clay. Polish ball peen hammer before texturing. Line up ricasso better with handle. Use more epoxy with stacked leather. Fully clean up blade /before/ epoxying it all together.